
***
This tutorial was updated on Sept. 28, 2007. Please see my flickr photo set with step-by-step photos.
And also check out the Button Bracelet and Button Jewelry Flickr Group.
***
What you need:
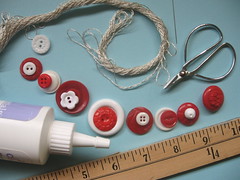
Embroidery Floss- (I used DMC® Metallic Embroidery Floss)
assorted buttons (any kind)
glue
scissors
ruler
2 -Light-medium twisted beading needles (you may not need these)I make my bracelets roughly 7-8 inches long. You may want to measure your favorite bracelet to get a better length for you.
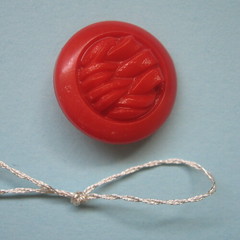
1. Cut off a 1 yard piece of embroidery floss. Put a dab of glue on each end and twist each end to a point and allow to dry. This will give ou a semi-rigid “needle” for threading through the buttons. If this doesn’t work for you, you can use a beading needle to thread your buttons.
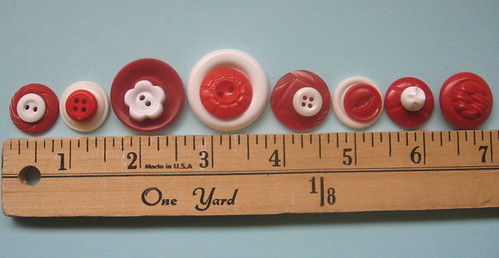
2. Arrange the buttons you will be using in a 7 inch line with small spaces(1/16) in between each button.
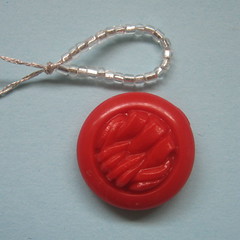
3. Take embroidery floss, fold in half, make a loop (big enough for last button to fit through) and tie a knot. You can add seed beads first to make latching on/off easier.
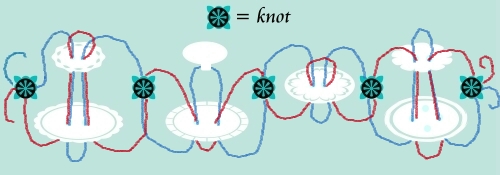
4. You will have two ends of the string in which you will weave in and out through the buttons in opposing directions. This keeps the button from twisting and flipping over. Use the following diagram.
5. Weave one button at time, knotting in between each button making sure to tug tightly on the thread, until you get to the last buttons.
6. There are 3 options for finishing off the last button.
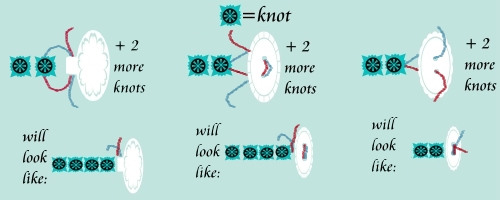
For option 1 and 2 you will be taking the thread through the button then finishing it off with two knots directly behind the button right next to the first two knots. For the third option, you will just take the thread through the button holes and do a double knot on top of the button. Trim the excess thread and add a dab of glue to keep knots together.
I never realized how hard it is to make a tutorial! Kudos to all of those lovely crafters that do this kind of thing often. I hope that my tutorial makes sense. If you have any questions please leave them in the comments or send me an email (regina AT creativekismet DOT com)
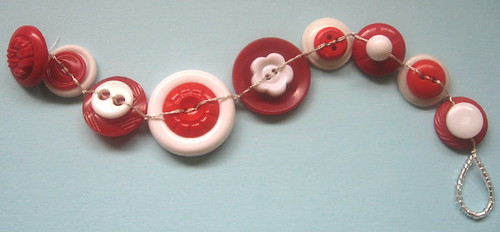
On a side note, I just wanted to thank everyone so much for all of the extremely nice comments that have been left on my posts -especially on the two previous posts. I’d love to send one lucky person the above bracelet or this green/yellow shell bracelet (your choice). Just leave a comment (and a note on which bracelet you like best) and I’ll draw one name on Friday. Thanks so much everyone!
Wow! Thanks for all the great coments, once again. I’m having a super busy day today and will be drawing the name of the winner late tonight (central time) and posting the winner first thing in the morning. The winner will also be notified via email. Thanks 🙂


ah!!! A tutorial! Thank you!!!!
This is a great summer project to do with my girls. I love projects where the end result is something beautiful I can use! Very kind of you to take the time to put it into a tutorial. Thank you. Please put my name in the hat for the green/yellow one 🙂
Would love to be the very proud owner of the green/yellow bracelet so please put my name in the hat for that one ! A very generous thing for you to do by the way.
OOoh thank you for doing all the work to make this tutorial! I am saving this page, and I am really excited to make some of these button bracelets once I collect a bunch of buttons I like. You’re the best Regina!
Great tutorial! You are so sweet to offer one up!! Hmmm, yes please put my name in the hat as well. I like the green/yellow one best.
Happy 4th hon!
a.
This looked like it was quite a bit of work to put together, this tutorial! Thank you for doing that! I would like my name in that hat for the green one too! How nice of you!
Happy 4th Regina!
Sarah
Your tutorial drawings are fantastic. They are as creative as the button bracelets themselves. My favorite is the green one. I’m off soon on vacation but I want to try to make one when I return.
Thanks for the tutorial! Ooooh and a giveaway – exciting!
I love both so if I win u can choose heehee!
I absolutely love them both, but I think my favorite is the green and yellow. Thanks for taking the time and effort to post a tutorial, and give us all a chance to have one of your originals!
Wow, that’s a great bracelet+tutorial! Great minds must think alike because I just made a shell button necklace that I’m about to post. It’s amazing how with the same materials you can make such a variety of things. (In the off chance I win, I pick the red one!)
Thank you so much for the tutorial! What cute bracelets – a difficult decision to choose one. I think the red and white one is very cute, but the shell buttons seem so perfect for summer and would be my first choice (but barely!).
how sweet of you to make this wonderful tutorial! to offer a bracelet, too, is just the icing on the cake!! i would love to be in the drawing, and i would be the proud owner + wearer of either bracelet, if i was the lucky one (but i think that the green/yellow combo may be my slight favorite!). 🙂
Beautiful bracelets and a clear and easy-to-follow tutorial. I’m headed upstairs to the button box – I think a little project is in my immediate future… but I don’t think I have any buttons as nice as those in your yellow and green bracelet. That one would be my favorite, if I were to be the lucky winner! Thank you!!!
Awesome craft project, Regina, and a very nice tutorial!
We have three teen girls at home, and I think they’ll all try their hands at something special like this. Bith designs are cute, but if I had to choose, I think the shell version is very classy!
ooooh, thank you for this! I have a vast button collection, and now, something to do with it!
Great tutorial! Thanks for a fun idea. I’m going to enjoy looking through my buttons this afteroon so I can try out a bracelet. 🙂
Looks easy with great results. I’ve got to pass this link on to my daughter. I know she’ll want to make one. (She’d love that green and yellow bracelet, I’m sure.)
These are SO gorgeous! I always wondered how people do this — thanks so much for the tutorial! Now I can finally try it with my own buttons. I like them both, but I have more things that match the green and yellow one.
Those shell buttons are gorgeous. I came from Craftlog, Amazingness!
This is a great idea. We do crafting with children at a soup kitchen and this would be a great one to do. Thanks for sharing and making it so clear.
Great tutorial! It makes perfect sense. I recently acquired bunches of mismatched buttons, and this would be a fun thing to do with some of them. I would also love to be in your drawing. The green and yellow bracelet is beautiful!
How lovely!! As soon as I post this comment, I’m tagging this in del.icio.us. Your shell bracelet looks so sophisticated…
Thank you so much for such a great tutorial! It looks really clear and you’ve totally inspired me to give it a go…
hey..i think its a great idea to use these buttons for a beautiful bracelet moreover they can make for lovely little presents for ur friends. what can be more touchy than to gift something handmade..thanks. The green and yellow one takes the cake.
besides offering such a comprehensive tutorial, you have allowed me to dream of the bracelets i will be making, using buttons i have inherited from my mother. she was an amazingly crafty person so i even think i have some of her embroidery threads packed away. thanks for giving me ideas which lead to warm and wonderful memories! you are a real sweetie to offer your lovely bracelets for this contest .. mmm
buttons have to be one of the greatest tactile memories for me as a kid. there was nothing better than to bury your hands in mom’s button box while she was stitching up dad’s workpants on the sewing machine. the stuff in her sewing chest was incredible from sock darning eggs to pompom makers and frogs. Thanks for the memories. think i’ll use some of her old ones in a bracelet. buttons have such character and use. (red’s my favorite color.)
These are lovely. I’m going to be raiding the button supply this weekend. I especially love the green and yellow shell bracelet. (I think I’ll need to go hunting for shell buttons.)
Absolutely stunning. I have boxes of buttons and now another idea of what to do with them. Great, clear tutorial – thanks. Off to wander around the rest of your site now – it looks fab
Pingback: Apfel(B)log
So beautiful!! I can’t wait to try to make my own…..BUT I would love to be the receipient of the red/orange one!! Thanks again!
I love them both ! Thanks so much for the great tutuorial!
I would love either bracelet that you choose and could you throw in the yummy tart also !!
Thanks , Erika
love them all, you choose!
I made my first button bracelet with your tutorial as a guide this morning, and it was so easy. Great job, I’m hooked now!
Holy cow you should do more tutorials! Look at all the comments!!! When you launch your store make sure to do another one of these contest drawings to advertise your opening!
Pingback: inaminuteago - the blog » Button crafts
awesome tutorial! i really like the way you layered the buttons…and too cool that you’re sending one away…i would love the blue/green one!
Thanks for the great tutorial! Must round up some buttons now.
This is fantastic – thank you! I have been looking to make a necklace, having already made some button rings and earrings and now I’m going to have a go at your tutorial – thank you so much!
Pingback: Pensievin’ » links for 2006-07-08
I have just recently gotten into jewelry making, and I’m going to print out your tutorial. I really appreciate finding instructions that are so easy to understand. All I have made so far are bracelets.
Thnaks
Pingback: Stoff-Junkie.de » Blog Archive » Accessoires - Linkliste
Wednesday, September 13, 2006
I love how your directions are clear and color coded. Thank you for sharing. I have taken buttons off my childrens clothes (mostly those that were in poor condition that I could not pass them on), siblings, clothes from yard sales grandparents (I even have my grandfather’s buttons from his WWII uniform). I have them in jars with a small sticky lable underneath which child etc.. they are. So I am going to make bracelets and necklaces with them and attach little notes about whose buttons etc….
Pingback: The Silent K » Blog Archive » Good: Making time for the husbands to pursue his passion
this is so neat. My imagination is running…..
Purse handles… belts…
thanks and I will try this with my abundant button collection.
I have been searching for this for a good while now!!! Thank you so much for making a tutorial. My mother collects jars of old buttons, so this will be a perfect little gift to make her!
I finally made one!
Pingback: The Silent K » Blog Archive » Slow like honey, heavy with mood (content mood, that is)
Hello..I would like to thank you for making such a cool tutorial…I made 2 bracelets this weekend and inclided links so that you could see what Ive done…. 🙂
http://static.flickr.com/119/295844253_98029f2144.jpg
http://static.flickr.com/121/295843972_73c6b5fe60.jpg
THANK YOU FOR THE INSTRUCTIONS FOR MAKING THE BUTTON NECKLACE. THE ONE THAT JENNY WHERES IS SO PRETTY. I LOOK FORWARD TO MAKING ONE FOR MY DAUGHTERS. CAROL, YAVAPAI CO.
Is there a way you could send me the instructions for the Button Bracelet i saw it in a magazine but i don’t rember how to make it Thanks Alot
i guess im toooo late to win. just discovered your site and got all shook up! i shall have to button up my lip and not string my self along thinking i might win your bracelet . not much extra $$$ for crafts,but buttons are always avaliable arent they? i cry cause im too late,should have looked for date,your designs are great,i appreciate and will continue to create. thanks mate.
Pingback: Stoff-Junkie.de » Blog Archive » Schmuck - Linkliste
I just wanted to say that I think this is a great tutorial – I’ve actually been thinking of making some sort of button bracelet similar to this, but I wasn’t quite sure how to go about doing it; looks like you’ve done all the hard work for me! 🙂 I’m adding this to my list of summer projects – I’ll link you on my blog when I’m done!
Pingback: Button Bracelet « Green Mama
Pingback: Button crafts « In a Minute Ago
great really inspiring
i am a knitter but love buttons so will give yours a try thanks so much they just look great
It was great to find a place where I was able to see how to do something I wanted. Thanks for sharing your knowledge.
Pingback: Featured Blog: Creative Kismet « Feathered Fibers
Its a rare idea.Its a easy and good tutorial for making button bracelet.
Pingback: Födelsedag för trollkarlar. « Kafferepet
As a young girl I strung my grama’s buttons for something to do – now I can go through my button jar & actually make something I can wear & enjoy instead of just looking at them now & then! Thanks sooooo much for the tutorial – can’t to give it a try!!!
this is awsome but i dont have buttons!!! too bad
Thank u so much it really helps in a jewelry store they sell them 4 2$. Don’t you have any more tutorials for different jewelry?
great tutorial – thank you!
I’ll having fun going through my treasure box of buttons to put together a bracelet.
I love your button bracelet and tutorial. Good for you! And thank you. We all love to know the secrets of how to make some special item from things we have in our button boxes. I also make button jewelry and love crocheting buttons onto necklaces.
Thanks again,
Kari
no e entendido ni pagorela idea
HI
Your bracelets are darling. I would love to win any of them with red being my favorite.
Thanks for the pattern.
Joyce
ola qee liindoh es m,uii buenah la pagina
ola qee liindoh es m,uii buenah la pagina
Great Idea!!!
-mines turned out beautiful thnx to the button bracelet tutorial.
THANKS THIS REALLY HELPED ME. I MAKE BUTTON BRACELETS THESE R BRACELETS (MADE OUT OF SMALL TRANSPARENT BEADS) AND HAS BUTTON ABOUT THE SIZE THE BASE OF AN APPLE. (SO ITS A LARGE BUTTON) THEN I PUT BEADS ON 1/3 THE WAY OF THE STRING, THEN THE BUTTON, THEN THE REST OF THE BEADS. THEY COM OUT REALLY KOOL. I SELL THEM 4 1.00 EACH AND I GET ALOT OF MONEY. I’M STARTING A BISNESS. PS. THE BEADS MATCH THE COLORS OF THE BUTTON!!1 I LOV BUTTON BRACELETS AND THEIR KOOL FOR PRETEENS AND TEENS ! TALK ABOUT STYLE!
Pingback: Schmuck - Linkliste | Kostenlose Schnittmuster
Pingback: Schmuck - Linkliste | Kostenlose-Schnittmuster.de
Pingback: Como hacer pulseras con botones PARA NIÑOS Y NIÑAS . INFANTIL E INFANTILES
Your designs are fantastic! Is there anything you wud recommand for a child something simplier perhaps
Oh I am definately going to have a go at this. lovely tutorial.
Pingback: The How to Make Jewelry BLOG » Blog Archive » A Fun and Funky List of Free Jewelry Making Tutorials Around the Net
Pingback: Button Bracelet Tutorial · Jewelry Making @ CraftGossip
Pingback: Leader Lobby » Blog Archive » Making Buttons for Bracelets and More!
hola yo no entendi nadita de lo hicieron pero me gusto la pulsera que hicieron
Thanks very much for the instructions. I am an seed beader and have enjoy incorporating buttons into my work.
Pingback: Favourite Links « Hi Popcorn . . . Hey MushroOm!
Very cute idea! Thanks for the tutorial.
como me encantaria que lo hisiern en español……….. esta linda
I heard about your blog from somebody on our Facebook page and I thought I would check it out. Thank you so much for this information, I thought it was fantastic!
you make it look so easy
Thank you for sharing your talent with a terrific tutorial. I have buttons from my mom, my grandmother and a great aunt; not to mention all the buttons I’ve collected in my 70 years. Our little craft club will love this project as much as I do. Crafts keep my brain active and the joy from creating something so lovely from a common item is a major plus.
So lovely buttons! Fnd your blog is so wonderful for me.
You made a few nice points there
Your tutorial is an awesome inspiration! Many thanks for sharing. I would like to feature your designs at http://www.handmade-jewelry-club.com/
Contact me here if you have a concern.
Jane
http://diylessons.org/
Pingback: Quixotic Pixels » Beads & Buttons
it’s easy for me.and it’s very beautiful. thank you.
Pingback: Craft Tutorial – Button Bracelet
I have made this the tutorial of the day on The Crafty Artisan!
http://wiserunning.com/blog/
This button bracelet is pretty cool! and the tutorial and instruction is very detailed and easy to follow, so nice of you for having this posted here. Thanks a lot.
i would love to be in the drawing, and i would be the proud owner + wearer of either bracelet, if i was the lucky one (but i think that the green/yellow combo may be my slight favorite!)
Pingback: 137 inexpensive, handmade holiday gift ideas, Part 4 - Crafty Nest