
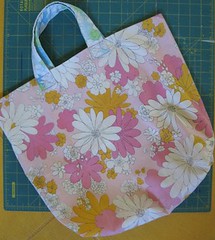
Many of you requested a tutorial for my pillowcase grocery bags. They are super easy and quick to make, involving only straight line sewing. The straps actually take a bit more time than the bag itself, but still easy enough. Hopefully these instructions are easy to follow.
Here is what you will need:
–Cutting mat or nice large space to work on
–scissors (rotary cutter optional)
–Thrifted pillow case (any size), washed and ironed
–Sewing machine, thread, pins and sewing needles(optional)
–hot iron
–About one hour of time and some good music.
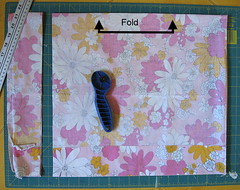
- Turn pillowcase inside-out and fold in half long-ways.
- Cut a 3-4 inch strip off of one side. Save the long strip for the straps.
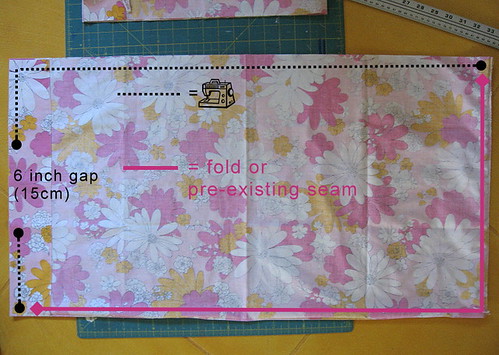
- Open and lay flat. Pin together the open sides. You will be sewing this together in the following manner, leaving a 6 inch (15cm) gap in the center.
- Cut a 2 inch square (a) off of all four corners (b) making sure to measure from the folded edge and and seam, not the rough edge.
- Following THESE instructions, you are going to square off each corner (c).
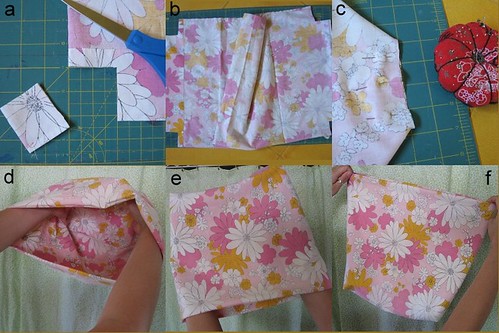
- When all four corners are sewn, flip the bag right side out through the open gap and sew the gap closed (hand or machine– I used my machine for this). Now you will have a completely sewn shut, empty pillowcase with squared off corners.
- Now the fun (and kinda hard to explain) part… Fold the pillowcase into itself by stuffing the just sewn together gap-end into the bottom of the opposite end. The sewn together gap-end will be the inside bottom of your bag(d) and the squared-off corners will meet together on each side(e). Does this make any sense at all?
- Once all the corners meet(f), iron and then sew around the top edge. Now you are ready for the straps
There are many ways to make straps, this is just how I do it. I just don’t like sewing all around the edges of a skinny strap and then try to turn it right side out of a little hole on the end.
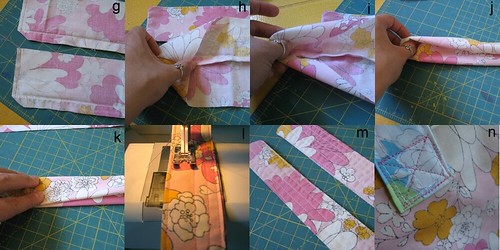
- Cut off the big hemmed end off of the remaining strip. Fold the strip in half long-ways and cut again. These will be your two straps. They should be 12-16inches long each.
- With the right sides facing in, sew together the short ends of each strap, leaving one long side open.
- Trim the corners(g) and turn right-side out.
- Following the picture above, fold the ends towards the inside so that the raw edges are tucked inside(h-j). Once it is straight and flat(k), press with an iron and sew together(l-m).
- Lastly, sew one strap to each side of your bag with big criss-cross squares(n) and you are done!!!
Now, my editor (Mr Creative Kismet, who really isn’t very creative as far as sewing is concerned, but did major in english lit) said “um, this sounds good and seems to make sense?”. What he was really trying to say was that he hasn’t a clue if this sounds right. SO, if any of you sewing buddies of mine out there in blog land think I need to tweek anything on this, please shout out, because I did use some of my own terminology which may, or may not, be helpful in this tutorial. Thanks!


Love your tutorial. Come visit my blog…All the way from Malaysia.
I love ‘tutorials’!! I’m so glad I found you… how VAST this blogworld is! Your header inspired me without reading any further. It’s so bright and inviting.
I’ve been making pillowcases but haven’t made anything from a pillowcase. Here’s my opportunity.
I’ll close so I can go back and read your previous posts. That and a cuppa tea sounds good right now.
Fall hugs,
Joni
thanks! this is great!
Wow, how long did that tutorial take for you to photograph, set up, and post? You probably could have make half a dozen totes in that time, huh? :0) Thanks for taking all the effort, I’m off to the thrift store to search for… guess what?
Pingback: Crafting, really! Stop laughing! « Alpine Life
That’s great and thank you for sharing.
I’m heading to the thrift store tomorrow to pick up some pc’s — they’re a buck each [Newmarket, Ontario, Canada :)]. I’ve bought them before to cut up for fabric for quilts, but never thought of using the pillowcase itself as the basis for a project – this is BRILLIANT!!! Thank you!!
Wow! Wanted to make something interesting for Xmas. Now I have the sure thing. Thanks!
I actually had the very same print on my sheets and pillow cases back in the 70’s! GROOVY!!
This is awesome! I needed a quick and easy bag pattern for my teen group! Thank you SO much!
LOVE IT. (And great pattern on the fabric too!)
Nice tote bag!
OMIGOSH…I had to comment because I had those same sheets when I was a little girl!!! I found you from over at Scribbit…love your tutorials!!
Pingback: Crafty Gifts to Make | Christmas 2008, present and sale
Pingback: Pillowcase Tote - Sewing Tutorial » TipNut.com
This is a great project. I just had one question about squaring off the corners. Do you just sew them or do you turn them some way, Im a little lost there (sorry new sewer). Can anyone clarify for me? 🙂
Fantastic. I can’t wait to have a go, I know I have some odd pillowcases here somewhere!
http://sewdelish.blogspot.com/
Thanks so much for this tutorial. I made my first one today and it turned out great.
http://flickr.com/photos/djlinedancer/2209860125/
Pingback: Darn Those Plastic Grocery Bags « Daisyeyes
I love it and will make lots. may put velcro on top for kids to use for fun.
Too cute! I love it.
Hugs and love
Sarah-Ann
Pingback: Sarah au
Thank you for this! My first tote has become my “shabby chic” purse and now I am about to make more!
Oh, I found you from Lisa’s blog! http://lisaboyer.blogspot.com
Cath
Pingback: Paper vs Plastic? Or Cotton vs Canvas?
Thank you so much for the tutorial. I’ve already made two bags this morning and you can check my blog for photos.
Pingback: I’ll do my part « Isle B. Stitching
Pingback: Paper or Plastic? | Information Shack
I have a question regarding the corners also…did I miss a step somewhere? the picture isn’t very informative and I can’t seem to figure it out! Any help would be appreciated… 🙂
I had that very pillowcase, but in the blue colorway, back in the late 1960’s. How cool to see its twin on your tutorial! Ellen.
many many beautiful.. you bag and the tutorial.
sorry for my english..
ciao
ciao
anna paola italy
Pingback: isle b stitching
I LOVE THIS SITE but this is the only thing I didn’t like when I made it I used it to carry my books to the public library, and when I put all my books in like 2 or 3 in it collapsed the seams ripped and it was a really big pillow that was strong.
Pingback: Pillow Case Tutorial / Quilting Gallery
I am so excited about this project and for the one who commented that it wasn’t strong enough for library books, nearly everything isn’t strong enough for books unless it is canvas. You could do the interior in canvas if you wanted to.
I wanted to let you know I have a pillowcase just like the one shown here. It is vintage made in about the sixties. I inheired my Aunt’s estate and there are so many pillowcases. Now I have something to do with them.
Have you ever heard of a circle purse? That would be a good idea on this if the outside of your pillowcase didn’t look that good. I saw a small purse, it’s cloth, with a zipper, cloth straps, and cordinating fabric. First make the purse and then you put circles all over it sewing them on the front of the purse. The circles are with both sides together, then turn inside out and sew around the circle, sew onto purse.
Diane
I have long made pillowcase dresses for my daughter. I’m kind sick of them, so now I can use my stock pile of pillowcases on grocery sacks. Great tutorial, I totally get it!!!!
Great idea, thank you for sharing. I made but used the pillow case as a lining. Made same width but shortened it. Thanks For the Bolg’s I have been looking for a Quilting blogg for monthe. Good Day fro Northern NY
Great idea I have made a bunch of reusuable shopping bags out of pillowcases. I usually line my bags with a solid colored pillowcase to make it stronger I have never had a problem with them ripping. I been using my reusuable bags for over two years now and have received many complients on my bags. I have found some great pillowcases and sheets in the thrift stores to use in my bags.
Thanks for the great tutorial… we had those sheets in 2 different colors – they were “hot” at the time! LOL
I actually have these pillowcases! *LOL* Love the suggestion–We bought a house from family that still had a lot of stuff in it, some of which was dozens of new and used pillowcases. I’m glad I haven’t sent them to the thrift store yet.
Wonderful patterns! Thank you so much for your attention to details and the great pictures. I just found your website, looking for a pattern for fabric flowers. I’ll be back here often! Thanks!
NICE
Pingback: Reusable Pillowcase Tote
Hello, what a great eco-friendly money saving idea! I think I might try one and perhaps use it as birthday or Christmas wrapping paper! Thanks for the pics with your tutorials too. 🙂
Very nice idea and very helpful tutorial. I love the photos and the explanations. I will try to make one myself. Thank you
I just wanted to say thank you for the tutorial. I used it today, it was simple and made a great bag. If you want to see what I made you can see a picture here:http://edutach.blogspot.com/2009/02/pillowcase-tote.html
Thanks again for sharing
Mary
Pingback: Pillowcase Grocery Bag Tutorial
Wow! This will make a great tote for my rotary cutting board!!! Thanks
Pillow case tote tuturial is very easy to make. The instructions must be followed step by step to get a tote bag.
Thanks for sharing this! Great tutorial and a great way to reuse old pillowcases.
I linked it at PassiFlora magazine (we have a post about reusable bags) http://passifloramag.com/2009/04/good-news/ I hope you do not mind.
P.S. I was unable to get a picture of the final tote. Feel free to send me a copy and I’ll add it to the post.
Pingback: sewing bug is back « Eyrie crochet
Pingback: Recycling Crafts | Little House in the Suburbs
Thanks for the great tutorial…I made one from a pillowcase
and another from some scraps of fabric then added a button
Pingback: Links: Old Pillow Case – Repurpose. « Food for the flowers to grow
Pingback: My Very Own Pillowcase Shopping Bags « the tummies
Oh my goodness! No way. You have the matching pillow cases to my thrift store find sheet that I turned into a summer duvet cover.
http://fimby.tougas.net/thrift-sheet-duvet-cover
Thank you for this great tutorial. Something I can actually sew!
Pingback: sewing day « Eyrie crochet
Thanks Mate from an Ozzie Shield by marriage. Just what I needed some easy sewing now I am retired, great pattern and instructions, will watch your page with interest Ta Val Sydney
that was fun…but i had to laugh…i KNOW those sheets…we had them in blue too…lol…and im 58…ha!
I love this! I just bought a sewing machine and am just learning to use it, this was a perfect beginner project for me! This also works well with a yard of fabric, doesn’t it? I bought some cute prints to try it out. Thank you for a great idea! Laura
Love it. Your english is just fine to an aussie. Maybe someone who has an english degree, just needs to learn to sew so he can understand the written word. LOL
I adore thrifted pillowcases and I adore making bags…thanks for the tute! I love that they are lined, and so, reinforced. Perfect! I have already made quite a few from this tute. Thanks!
Love your pillowcase tote…such a good idea!! Thanks for sharing!
What a great addition to the pillowcase dresses my faith group is making for Haitian girls. Missionaries have told us that children have nothing to carry their few belongings and this is perfect to add to the dresses that are being sent. This is heaven sent. Thank yo
Great way to reuse your old pillowcase.
Hi,Your right, #7 of the instructions kinda makes sense by the fifth time it is re-read. Still, I would like some more step by step pics. I’ve been saving these old pillow cases for ever looking for just this idea. Think you could accomodate me with just a little more visual aid? Thanks
Would love to ad this tutorial to my blog: The vintage sheet blog: http;//vintagesheets.blogspot.com. Please let me know if that would be all right. thanks
Just wanted to thank you for the design, I JUST finished making this and it was a piece of cake! (I’m new at sewing). Anyway, thanks!!
need help with steo C on the pc bag. The picture doesn’t really show what you need to do. Help Please!!!!
For those who seem to have problem with rule #5 c above, I did too. Note the words “Following THESE instructions, you are going to square off each corner (c).”
The word “THESE” is a link for instructions. Make sure you click on that word for more info. I didn’t catch it the first time.
Hi there!okay, I think i can understand everything except the first step. Which way do you fold the pillow case? It says long ways and cut off 3/4″ on one side? On just one side of the fold? Help, i love this and can make pillow case dresses, but this has me completely confused:).
You sure do make som beautiful things I love looking at them thanks so much for sharing.
Thanks for taking the time to post this! I know this has been up for a while, but the first direction I think you mean “short wise” because long way would imply like a hotdog vs. hamburger style. Also in #4 you say “edge and and seam” which is NBD but you did request revision 😉
Pingback: Travel Handmade [Refashioned Bags] | The Sewing Summit
How long did it take you to do this?
I just made this and I love my new shopping bag! Now back to make some more with the pillowcases I just bought at Goodwill.
I have this fabric ! Mine were sheets. I made a cover for my feather comforter.