
By special request, here is a quick little tutorial on the art of easy rubber stamping.
Supplies:

#2 Pencil, ball-point ink pen, linoleum cutters, paper, ink pad and rubber printing block.

1. Draw your image onto a piece of paper with #2 pencil. When you are happy with your image, go over again with pencil to make sure the lines are strong and dark. If you want to do a very simple image, you can draw directly onto the rubber printing block with a pen and skip to step 4.
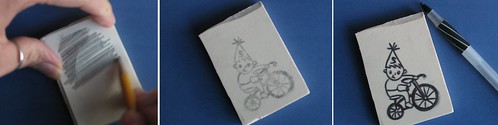
2. Now transfer this image onto the rubber printing block by putting image face down onto block and rub with pencil. You will have a backwards image. This is especially important when using images with words, letters or numbers.
3. Once the image has transferred, go over penciled lines with ink pen. This will give you a good image to carve around.

4. Now start carving using the smallest cutter (size 1) and carefully go around all the lines. Make sure you have good light and a steady hand. You don’t want to loose a nose, eye or very important line. *You can cut directly over the lines if you want a reversed image.
5. Once the image lines have been carefully carved around, use a larger cutter to get rid of the excess rubber.
6. When you are done carving, gently wash off little bits and dry thouroughly. Start stamping on a practice piece of paper to see your finished image. You may need to go back and carve any missed areas.
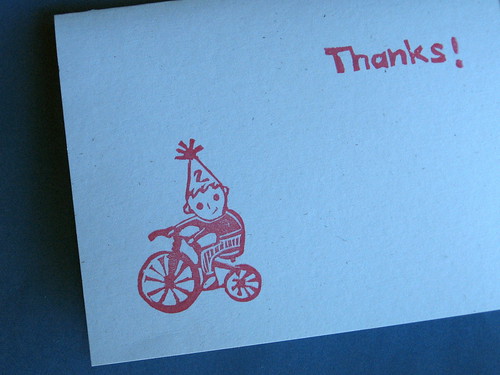
I’ve used my new stamp for making thank you cards. I hope this was helpful to those who have not yet played with rubber stamping.


Oh..that was fun to “watch”! I have had stamp-making supplies for almost a year, and I haven’t gotten around to using them, mostly because I didn’t know how to get the drawing onto the stamp. That looks fairly simple! This one turned out great:>
Your stamps are so amazing – I must improve my drawing skills before attempting this again but you’ve encouraged me to try!
Ooh, thanks for the refresher on how easy it is to make rubber stamps! It’s been a long time since I broke out my linoleum cutters. Love your thank-you card, so simple and what great line you have…
How do you find the time?
Thanks for the tut! I going to try it this weekend!!
Wow, that turned out beautifully Regina, Thanks for the tutorial!
I can’t wait to try this. My daughter loves stamps and this will be perfect to do with her!
thanks
Thanks for the tutorial. Another thing to add to the already huge list of things to try. You make it look so easy.
ooh, so much fun! love that little guy on the trike!!! JoAnn Fabrics has Staedtler MasterCarve on sale for only $2.99 for a big thick block. Great stuff that carves like butter. I just started carving last week and it is so much fun I don’t want to do anything else. ANYTHING.
This weekend my daugther discovered block prints at the Museum of Glass in Tacoma. She was instantly drawn to the form, and begged to stay to do more and more and more prints. I promised her we would do more at home, since I have the tools in my huge box of craft tools (I think I lent the brayer and it is still missing-in-action). I haven’t taken a picture of the prints we made, but is on my list for “next-blog-post”. Lo and behold, I spotted this on Whip-up. Craft synchronicity? Serendipity? Age of Aquarius?
One last thing I forgot to mention along the serendipity lines: there was a bar my husband and I frequented before we were married called “Kismet”. When we were dabbling with baby names just a few months later, kismet was on our short list, but we ultimately chose Sophie. Fate vs Wisdom. Hmmm. Still, I find it amusing that I happened upon your blog, called Creative Kismet, reading about block printing, on a night where I’m working on my blog at 1am, trying to divine a more accurate name for a what i do and what I write. I’ll be back to read more.
this little tutorial is fantastic- I’m desperate to try carving my own stamps now. If only I had your amazing drawing skills…
Pingback: Kismet Abounds « HomeWork
It´s a beatiful work!!! I like it!!
Saludos desde Guatemala
Hi! Wonderful rubberstamps you´ve made!! Is it ok if a write about them om my site? (www.pysselmani.se) It´s a swedish craft site 🙂 /Maggish
very interesting point of view, has never been conceived of this
[url=http://aldebaran.blogsavy.com/]furcate[/url]
Hi!
Thanks for the great tutorial 🙂
thanks for this great tutorial. any suggestions where to find rubber blocks, do you usually order them online?
i added a link to your blog from cake maker, your posts are so interesting.
xo
kittee
Pingback: Rubber stamps / Radiergummistempel « morningflower’s blog
Pingback: Rubber Stamping | Crafty Natalie
glad i came across your website! loved the tutorial and got a chance to make some stamps of my own!
Wow! Just the kind of easy, very useful craft idea that I’m looking for. More please!
I bought a grabbag of “fun stuff” at a yard sale. When I got home I found it had the 3 linoleum cutters in it. A search brought me to your tutorial. Thank you very much. Susie
Hi there,
I’ve recently decided to make some rubber stamps and I was so happy to find your tutorial today! I wish I could find Speedball products in Australia – will have to keep on hunting for them. Thank you for this and all your great tutorials!
Pingback: Friday Links | salty
hi!!! thanx for the awesome tutorial…. and i must say your a really gifted person and eacha nd every thing on ur blog is awesome!!!!
great tutorial! I love the result. Thanks for the adress here I can find the rubber printing block. I don’t know if this material already arrived in my country, Portugal.
THANKS, SO MUCH;-)
Pingback: Studio thursday | weloveyourwalls design blog
Muito lindo seu carimbo de borracha!!!
Very beautiful your rubber stamp!!!!
Congratulations,
Suzana
Good day!
I would like to present my site:
praca wzbogaca [url=http://sprawdz-dostepnosc.blogspot.com/]praca wzbogaca[/url]
To greet!
See you!
Great tutorial! Thanks for sharing! ~Diane
About the blocks you linked to, do they crumble much? The first ones I tried did, but the Mastercarve ones seem a bit pricey.
Merci bonnes explications
Thank you for sharing your knowledge. God bless.
I have been coming across rubber stamps on my serach for postage stamps. The more i read the more interested i become. Thank you.
Hi! I am looking to create a rubber stamp for my buisness cards! I can across your tutorial..awesome!
Where are you from? Can you email me so I can ask you something!
quijano.marisa@yahoo.com
I love this post!!!!!!!!!!
xo
Marisa
I’m really impressed together with your writing talents and also with the structure in your blog. Is that this a paid subject or did you customize it your self? Either way keep up the excellent high quality writing, it is uncommon to look a great blog like this one today..|
What’s up friends, good paragraph and nice
arguments commented here, I am actually enjoying by these.
This is so cool! Never thought to make my own stamps before! Mind=Blown!
Kate | TheOrganizedDream.com