
First, I want to thank everyone for all the shop love. I truly appreciate all the kind words, support and the orders! Talk about a nice little lift in confidence, which I dare say, was lacking in the past.
Now on to pincushions. A few people have asked how I made these, so why not do yet another tutorial? They’ve been on my mind a lot since I made them. These are fairly easy, take about an hour, and it’s a great way to use up little scrap pieces. I am really loving the mixing of different fabrics.
You’ll need: paper, pencil, 6 pieces of coordinating fabric, 6×6 inch backing fabric, sewing machine, iron, fiberfill, embroidery thread and needle, and buttons.
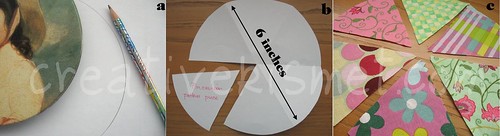
A. To make the pattern, simply trace a circle (plate, lid) onto a piece of paper. The diameter should measure 4-6 inches, depending on how big you want your pincushion.
B. Cut the circle out and fold into 6 equal wedges. This is an important step, so refold until you have equal pieces. Now, cut out one of the wedges and that will be your pattern piece.
C. Using your pattern piece, cut out 6 pieces of fabric. Iron and arrange.

D. Sew two wedges together, right sides facing together, with a 1/8-1/4 inch seam allowance. I use 1/8 inch seam allowance for this. Whatever you use, be consistent when sewing all the wedges together.
E. Press seams open before (F) sewing on the next wedge. Sew on the third wedge making a half circle. Again, press all seams open.
G. Repeat with remaining 3 wedges. This will give you two half circles. With right side facing together, sew the two halves together down the straight side. Open and you now have a pretty patchwork circle. Don’t worry if the center points don’t meet up. That’s what the button is for (covering that part up). 😉
H. After pressing all seams open/flat, use your finished circle to trace onto your backing fabric. I used felt for this, but any fabric will do.
I. With right side facing together, sew the two circles together by sewing all around the edge using a 5/8 inch seam allowance. Leave a 2 inch gap for stuffing. Trim with pinking shears (optional).
J. Turn right side out ( wouldn’t this make a pretty coaster?).
K. Start stuffing with fiberfill until you reach the desired plumpness. Slip stitch the open gap closed with regular thread and needle.
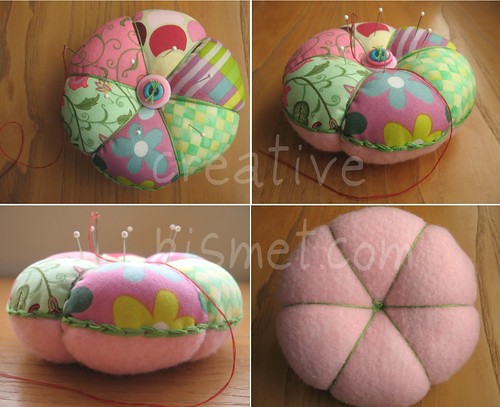
You can take it a step further and sew an embroidered chain stitch all around the perimeter of the cushion along the seam or move onto the next step, which is making the “petals” so to speak. There is a great tutorial on Whip Up on exactly how to do this HERE. You would do the same thing for this pincushion using the wedge seams as your guide.
And finally for the center, sew on your favorite button(s), bead or add a small object and your are all done!!
Any questions? Leave them in the comments or send me an email (it’s on my sidebar).
Have a lovely weekend!!
update: I have made this into a 2 page, printable document. Click HERE. Please note that this is to be printed for personal use only. Thank you.


Thank you for this great tutoial!!! :o)
greetings, lina
Love the pin cushion, cant wait to give it a go, I think its the buttons on top that make it so special. I have just added you to my fav blog sites, cheers from Victoria
Such wonderful directions! Thanks for sharng!
Love the fabric/patterns!
What a great tutorial for something OH SO CUTE! And yes, it would make a cute coaster as well! :o)
Pingback: Patchwork tutorials round up
Thanks for the tutorial! It would make a cute coaster too:)
Pingback: Sew a pretty patchwork pincushion | diyblog.info
Gorgeaous. I love fabric…..
Pingback: the itch to create…
So good idea. maybe it could be into mass production for so many people.
I love this! It would be great to enlarge and make it a pillow for a little girls room!
I am teaching my daughter (age 12) to sew this summer. I stumbled on to your shopping bags and got so interested in your website and found this cute pin cushion. Your instructions are very clear. Thanks for sharing. I am amazed. Blessings!
Pingback: how do i make patchwork clothing
how do you a divide a circle in 6 parts?/ really anxious to make this. It’s sooo cute!
Pingback: Make Something - Pincushion Tutorials and Pattern | Miss Behave
Love this pattern…I am going to use the pincushions for a favor for the ladies at my afternoon tea this year…Have all kinds of scraps to use…
Thank you!
thanks for sharing.
I have been looking for a pattern for a pincushion just like this. Thanks. Could I post a link to your tutorial in the sidebar of my blog under tutorials?
cute tute! thanks…i think i’ll make one tonight 🙂
I made one and it looks good your tutorial was great. thanks
XPECTACULAR DISEÑO Y TUTORIA DIOS LE PAGUE LE PUSO MUCHO AMOR Y PACIENCIA SALUDOS DESDE ECUADOR GUAYAQUIL
I have made these cute pincushions before but not in patchwork style (not being a patchworker/quilter). Your tutorial is so clear that I am now going to make my first one as I have always admired patchwork ones but was not brave enough to try it out on my own! Thanks so much!!!
Love the tutorial. Just had to make one! Thanks for the great instructions and photos. You can see a picture of mine on my blog. http://yarnbox.blogspot.com/
thanks for this great tutorial !
Pingback: 60 Free Pincushion Patterns : TipNut.com
Realy I love this,seguro q lo hago ahora!!!I make one now!!!thanks for share.sorry for my ingles
hi… I luv ure Blog… Thx for Share
God Bless
this is simple and lovely! win win. thanks for the tutorial!
gonna have to make this.
Adorable, sweet, cute, lovely and a God send. Thank you, thank you, thank you, and muchos gracias :}.
Hola: Precioso el alfiletero!! Gracias por compartir este tutorial!!
Hi, I just got my first sewing machine yesterday, and this was my first ever project! Turned out lovely, thanks to your fantastic instructions. Though I am gonna have to practise sewing in circles!
Very nice. A mama showed one on sewingmamas with a link. I can’t wait to make one myself.
Thanks for this tutorial, I just made it and I put your link on my blog
I’ve seen some of these on Etsy and have been meaning to make one – but didn’t have the time to formulate a pattern first. This is so easy to do – the pictures are very helpful. Thanks for sharing!!!
Thanks so much for sharing your pincushion and with such clear instructions and photos. I have made one to put in a sewing box I am putting together for my daughter’s birthday. Do want to see it?? Nancy
Love your color choices! Great tute! Thanks for sharing … I’ve posted a link.
My twin sister and I have decided to do a sew along together and our first project is going to be your pin cushion! Thanks for the wonderful pattern and step by step instructions!
How very clever! I can’t wait to make several for all my quilting friends for Christmas!
I love this!!! Thank you so much for sharing 🙂
Is there a printer-friendly version? My friend and I want to start little sewing projects together, and this looks perfect!
cuanto! siento no saber suficiente ingles para poder expresar las gracias por estos preciosos tutoriales.
I loved the pattern and the colors you selected. Thank you for sharing . Have a blessed day. Texas Girl
Very cute and perfect combination of fabrics! I’d love to have printer friendly instructions for a free community sewing class I teach at the local public library. Is that possible? Thank you!
Pingback: vi är änglar med blickarna högt i det blå « Skapandekaos och Garnmissbruk
Thank you so much, this inspired me! Now all my friends want one.
http://www.flickr.com/photos/mizzledrizzle/5539223929/
Lovely pattern. So glad you made a tutorial for us. Thanks.
May we use your pincushion pattern for a Christmas work shop with a max of 10 quilters?
wow! surely, i’m gonna try this! thanks for sharing, this is really pretty!
Thanks for the very easy to follow tutorial!! I’ve always wanted to make one of these. Now I will!!!
lovely artes!! thanks for tutorial!!
I am so excited to start this. You got great ideas for Christmas. Love your patterns & tatorial.
thanx for the tutorial! my sewing students are gonna love this!
Many thanks for sharing. I do love this pincushion and your tutorial is so clear! Enjoy your sunday.
Thanks for such a great tutorial. My pin cushion has gone missing (hopefully nothing to do with our toddler!) and I need to make another one – I think this fits the bill!
You can add a wee bit of steel wool in with the stuffing to keep your needles sharp 🙂
A very cute idea, I will be making these very soon. Thank you for sharing.
So cute! I have been looking for something like this for a while – and now found it. Thanks a lot.
Adorei .fácil de fazer ,parabéns vcs são geniais
Hi sweetie,
Thanks for this tutorial hun. 7 years old and still great! Thanks also for the 2 page printable!
Hugs!
Hello,
I came across this tutorial today and I think it will be GREAT for my students. I have a class of 8 students in a Boston, MA high school and I was hoping to get permission to print your tutorial. I would like to put it into binders for my students so they have resources to take with them when the class ends. Would that be okay?
Thank you,
Whitney M.